Creating Assets
The Portal provides Users with the ability to create Assets that are located at site or elsewhere. These Assets can be created through the Assets tab using the Create Asset function. The following details how to create an Asset:
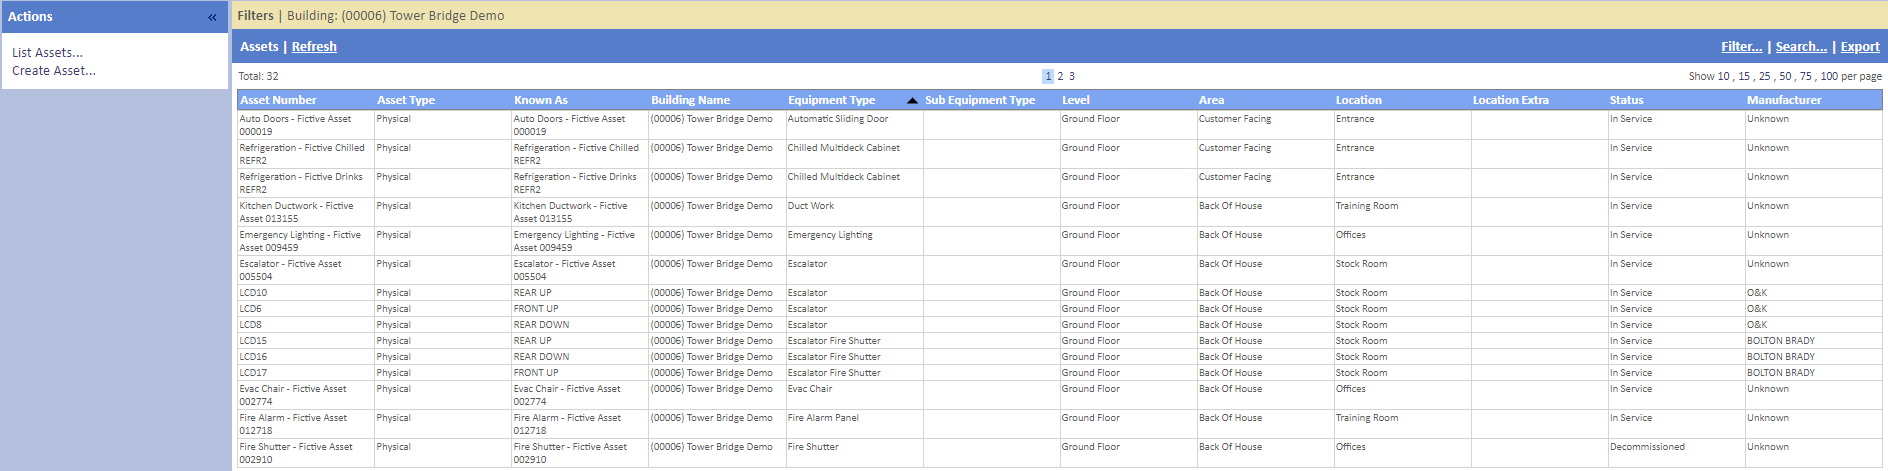
1. Clicking the "Assets" tab will display the Assets page along with the Search Assets pop up. Click "Cancel" to close this screen and click "Create Asset..." to display the Create Asset pop up.
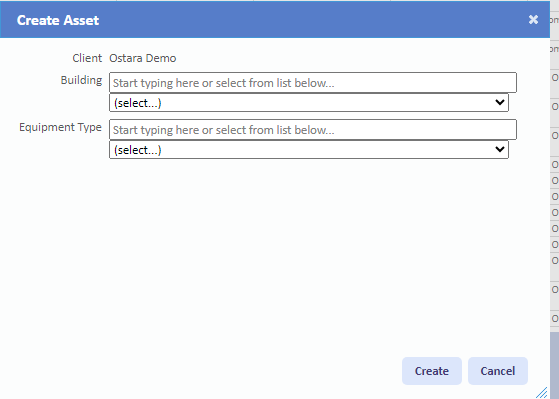
2. If there are multiple Clients, the User will need to select the Client the Asset is for. They are then required to choose the Building and Equipment Type from the relevant drop downs. Once chosen, click "Create" to move the Create Asset screen.
3. On the Create Asset screen there are four sections to enter information: Asset Number, Asset Location, Notes and Warranty. Each of these are described below.
Asset Number section:
Asset Number section:
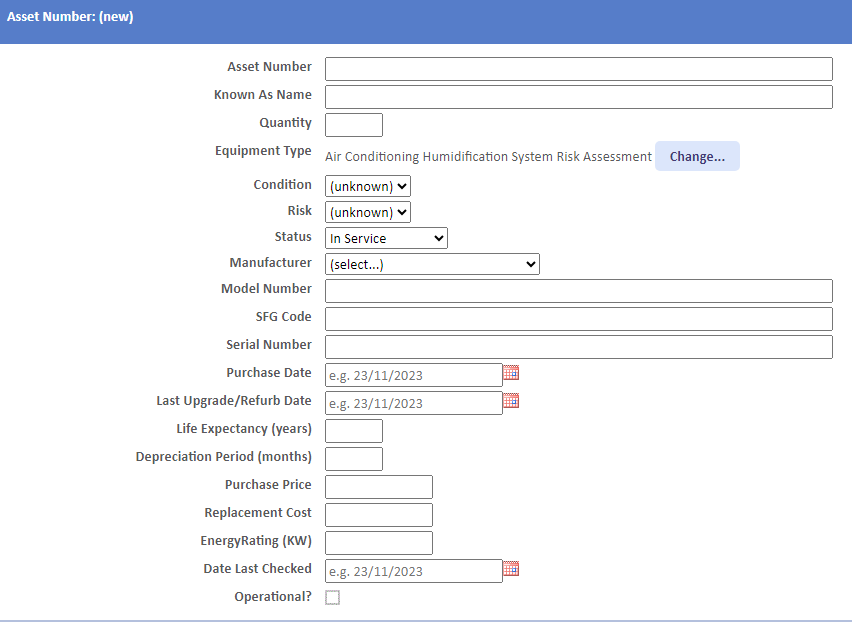
Known as Name is a freeform field to enter the name that this Asset is commonly referred to.
Equipment Type is a field that displays the Equipment Type selected for the Asset. Clicking the "Change" button will allow the User to select an new Equipment Type from the drop down.
Condition is a drop down field to choose the condition the new Asset is in. These conditions are configured in the system.
Risk is a drop down field to choose the risk associated to the new Asset. These risks are configured in the system.
Status is a drop down field to choose the current status of the Asset. A specific Permission exists to restrict a User's ability to change this field.
Model Number is a freeform field to enter the model number of the Asset. This can be numbers and letters.
Serial Number is a freeform field to enter the serial number of the Asset. This can be numbers and letters.
Purchase Date is a date field to enter the date this Asset was bought. Clicking the Calendar icon display a date picker.
Life Expectancy is a freeform number field to enter how long the Asset is expected to last for.
Depreciation Period is a freeform number field to enter how long the depreciation period for the Asset will be.
Purchase Price is a currency field to enter the amount the Asset was purchased for.
Replacement Cost is a currency field to enter the amount it costs to replace the Asset.
Date Last Checked is a date field which provides the ability to enter the last date this Asset was checked.
Asset Location section:

Location is a drop down field to choose the location of the Asset.
Location Extra is a freeform field to extra information regarding the location of the Asset.
Notes section:

Warranty section:

When the "Under Warranty?" box it ticked:

Warranty Resource is a drop down field to choose who the Warranty Resource for the Asset is.
Use as primary resource for this asset? is a tick box to specify whether the selected Warranty Resource is the primary Resource for the Asset.
Warranty Type is a drop down field to choose what type of warranty this Asset has.
Start Date is a date field which provides the ability to enter the start date of the warranty.
End Date is a date field which provides the ability to enter the end date of the warranty.
Click "Save" next to any of the sections once all information in entered to create the Asset.