Submit Purchasing Invoice/Credit Note
To submit an Invoice or Credit Note for a Purchase Order, click the Invoices tab and select the “Submit Purchasing Invoice” option or "Submit Purchasing Credit Note" option accordingly.
1. Upon clicking the "Submit Purchasing Invoice" option or "Submit Purchasing Credit Note" option, the Submit Purchasing Invoice or Submit Purchasing Credit Note screen appears. Enter the Purchase Order number and click the "Check PO Details..." button. This will check to make sure the job is at the right state before the Invoice is added to it.
Submit Purchasing Invoice Screen
Submit Purchasing Invoice Screen

Submit Purchasing Credit Note Screen (works in the same way as the Submit Invoice Screen)


2. If the PO entered can be invoiced then the Building Name, the Job Task and the "Upload Invoice/POD..." button will be displayed along with the Shipments and invoice fields. A copy of the Invoice must be present to be able to submit the Invoice. The User can upload a POD (Proof of Delivery) but it is not necessary. Clicking the "Upload Invoice/POD..." button will display the Upload File screen which requires the entry of a Name, Type (which can be either "Purchasing Invoice", "Proof of Delivery" or "Purchasing Invoice & Proof of Delivery") and the file that needs to be uploaded. Once the document has been selected, click "Upload" to upload the document. Now the rest of the Invoice/Credit Note details need to be entered. These include the Invoice Number (up to 30 characters), ticking the Shipments if the Invoice is valid for the entire Shipment(s) and any changes to the Delivery Net if necessary. The User also has the option to tick the box in the Qty Selection column against the relevant item and enter the amount items that this Invoice is valid for. This means that the whole order doesn't need to be invoiced for in one if it is not necessary to do so.
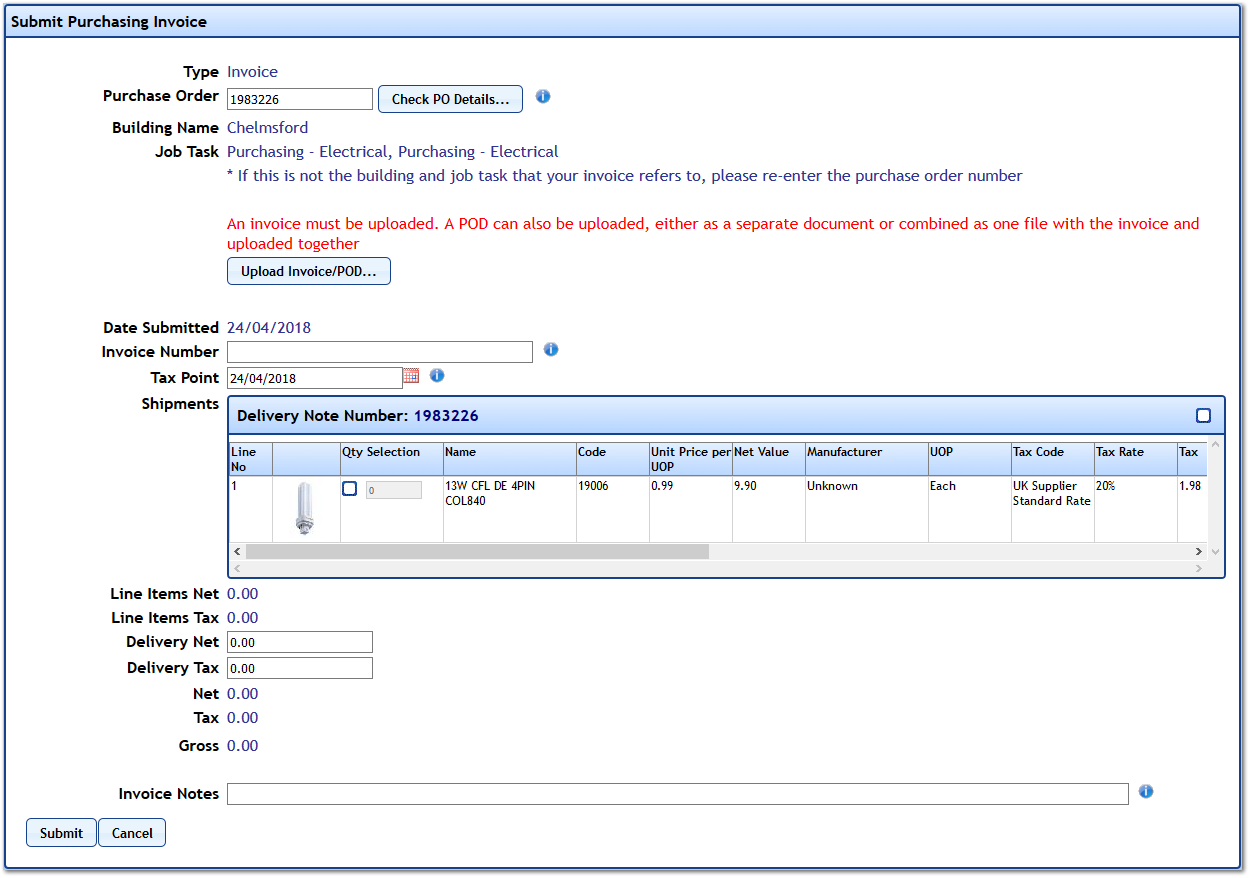
Note: It is also possible to invoice for just the Delivery Charge if need be. Just enter the amount of delivery that will be charged in the Delivery Net and leave the Shipments unticked.
3. Once all these details have been entered, click the "Submit" button to submit the Invoice/Credit Note. Clicking "Cancel" will cancel the Invoice submission.
Note: Any extra information can be added into the Invoice Notes field.
Note: Once a document has been added, a table appears to show the document and the types of documents that have been added. Next to each document is the "Remove" button. This deletes the document and the User must replace the document with a new one.

4. After the Invoice/Credit Note is submitted, it will appear in the Unapproved Invoices screen along with any other Invoices/Credit Notes that the User has submitted and are currently awaiting review.

Note: In cases where Resources belong to a Resource Grouping and Invoice Instructions have been set up, a pop-up will be displayed with some instructions informing the User in what their next steps are. Click "OK" once ready. This will display when the Invoice is submitted and each time it is edited by the User.