Create Contract
1. To create a new Contract, the first thing that is needed is to find the SRA that the contract is to be created from. See Searching for an SRA for further instructions.
2. Once the SRA has been selected, click on the Resource tab.
3. If there are multiple Resources allocated to this SRA, highlight the Resource to raise a contact for and click on the "Actions" button.
Note: A contract can be raised for each Resource on the SRA but more than one contract cannot be raised for the same Resource on the selected SRA.

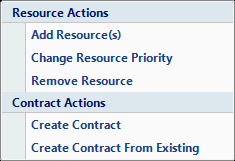
4. This menu will be displayed:

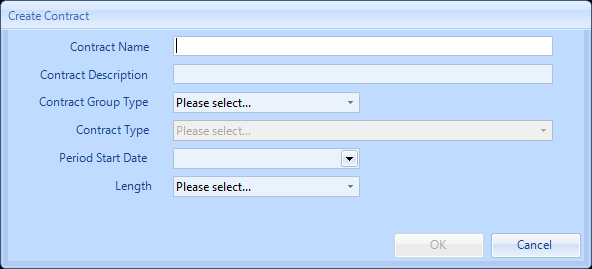
5. Click on the Create Contract menu option. This window will then open:

This is the first stage of raising a contract.
6. Add the Contract Name and Description. These are free form fields and can be the same if desired.
7. Contract Group Type - select from the predefined list whether the contract is a "Comprehensive" or "Pay As You Go" Contract.
8. Contract Type - select from the predefined list dependant on the previous field selection. This will determine if the Contract is a Reactive, PPM or a combination of the both and whether the Parts are deemed the be payable or not.
9. Clicking on the Period Start Date drop-down arrow will pop up a calendar for the User to define the Start Date of the Contract.
10. Length - select from a predefined list to determine the length of time this Contract is for.
11. Once all the information has been entered, click on the OK button. The User will then be presented with an "Are you Sure" Message. Clicking Yes will create the Contract, clicking No will return to the previous screen.
Please note: Once this information has been set it cannot be amended (with the exception of Contract Name and Description). If any of these details are incorrect after clicking OK the contract would need to be cancelled and re-raised.
Please note: Once this information has been set it cannot be amended (with the exception of Contract Name and Description). If any of these details are incorrect after clicking OK the contract would need to be cancelled and re-raised.
12. Please see Contract Actions for further information on how to complete all the other Contract details.
Note: When creating a Contract, the system will default the settings in the "Detail" tab to the following:
Reactive - In Hours:
Assignment Type: Automatic
Assignment Notification Type: Email
Acceptance Type: Manual
Reactive - Out of Hours:
Assignment Type: Automatic
Assignment Notification Type: Email
Acceptance Type: Manual
Quote - In Hours:
Assignment Type: Automatic
Assignment Notification Type: Email
Acceptance Type: Manual
Quote - Out of Hours:
Assignment Type: Automatic
Assignment Notification Type: Email
Acceptance Type: Manual
PPM:
Auto Generation? Off
List Email on Generation? Yes
PPM - Manual Generation:
Assignment Type: Automatic
Assignment Notification Type: None
Acceptance Type: Automatic
PPM - Manual Generation:
Assignment Type: Automatic
Assignment Notification Type: None
Acceptance Type: Automatic