Add/Edit/View Documents
This is the Add/Edit/View Documents screen. The majority of modules throughout the system provide the ability to add or view documents relating to that particular area. For example: when creating a Building, Users may want to include a picture of the Building for use in reports. This can be done by adding a file of type "Image". When the screen appears, any documents that have been added previously (documents added by the current User or by other Users) will be shown. Here is an example:
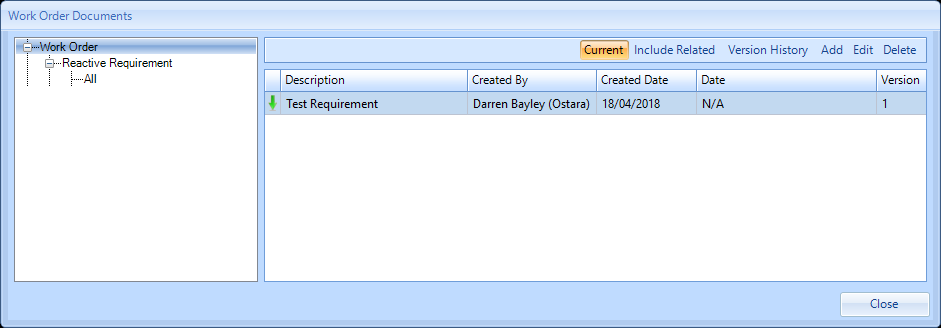
This screen has two sections: the Folder Structure section and the Documents section. When documents exist, the Folder Structure section shows the different areas where different Documents originate from. For Example, Building documents are located under "Building" and Work Order documents are located under "Work Order". Selecting an area in the Folder Structure section will filter the Documents section with the documents from the selected area. From this screen, it is possible to add, edit, delete and view the different documents.
When this screen is opened, the "Current" button will be pressed to signify that the documents shown are current (valid today). By pressing "Current" to deselect it, any documents that have expired will then be displayed as well.
To view a document, simply find the document within the list that is to be viewed and double click the item to view it. The document will then open using whatever application is relevant to the file type.
To delete a document, simply find the document that within the list that needs to be remove and click the "Delete" button. The document will then be removed from the system.
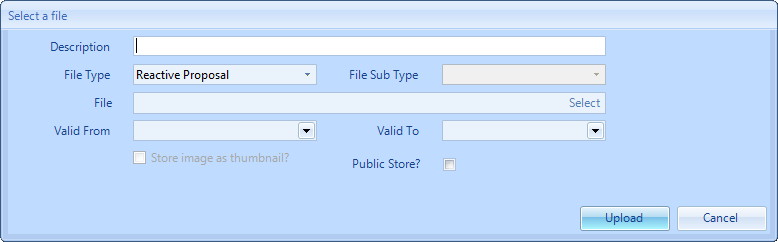
To add a document click the "Add " button. The next screen shown is where the details of the new document/file will be entered. Firstly, a brief description of the file is required followed by the File Type and File Sub Type (if applicable). Next, browse for the file to be uploaded then provide the "Valid From" & "Valid To" dates for the file (if applicable). If an "Image" file is going to be uploaded, it's possible to show that image as a thumbnail just by ticking the "Store image as thumbnail?" tick box. It is also possible to specify whether a document is a "Public Document" or not by ticking the "Public Store?" tick box. If a document is set to Public then it will be viewable across multiple of the same entity it was added to for the same Client (e.g. If the document is added to Building A for Client A, it will be applicable to Building B for Client A as well).
Finally, click "OK" to upload the document. The added document will then be shown in the Add/Edit/View Documents screen.
Finally, click "OK" to upload the document. The added document will then be shown in the Add/Edit/View Documents screen.
To edit a document, simply select the area in the folder structure, then the document in the Documents section and click the "Edit" button to the document to be edited. This screen will then open:
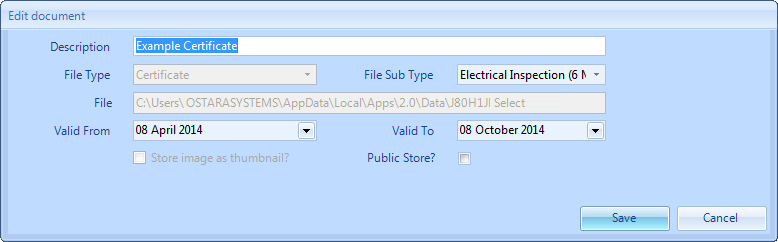
The following fields can be edited: Description, File Sub Type (if applicable) and valid from and to dates (if applicable). Clicking "Save" will save any changes made.
Note: Please be aware that when changing the dates on a Certificate that this will cause a Dynamic Dates update to occur, whether it be performed as Building or Work Order level.
Note: Please be aware that when changing the dates on a Certificate that this will cause a Dynamic Dates update to occur, whether it be performed as Building or Work Order level.
Note: If the User is editing a "Public Document" a message will be displayed:
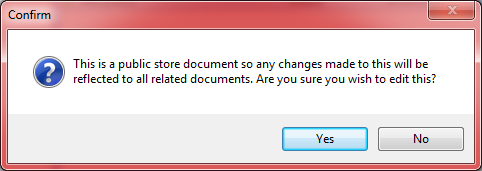
Selecting "Yes" will allow the User to continue with editing the document, the only difference here is that this change will be reflected in all areas the document is shown and not just in the one place. Selecting "No" will cancel the edit action.
If there are documents that exist elsewhere but relate to the item being viewed then this is where the "Include Related" button is used. Clicking this button will display any documents that relate to the item currently being viewed but were uploaded in a different area.
For example, opening the Work Order Documents screen will display the documents added directly to the Work Order but if the "Include Related" button is clicked, all other documents relating to the Work Order will also be displayed such as Building or Asset documents included on that Work Order.
Clicking the "Include Related" button again will hide all related documents again.
Note: A limit of 1000 documents per specific area, i.e. 1000 documents against a single building, single asset or single Work Order is in place.
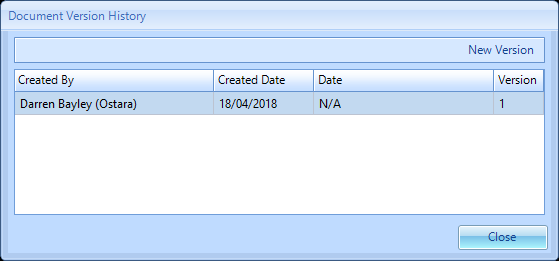
It is possible to version control documents using the "Version History" button on the Documents screen. By selecting a document, and clicking on the "Version History" button, the following screen will appear:
To add a new version of the document, click the "New Version" button, then populate the screen that appears. The User will not be able to edit the File Type and File Sub Type fields:

Once a new version has been uploaded, the Version column on the Documents screen will then show the latest version number, and the Document Version History screen will show all versions, and allow access to all stored versions of that document.