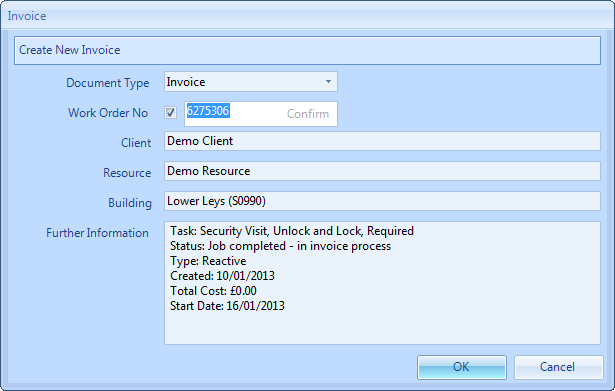
Create New Invoice
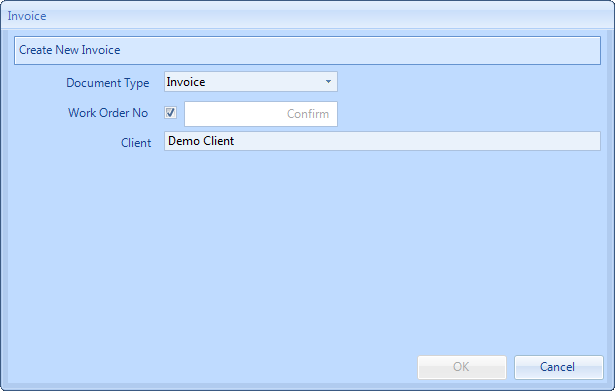
3. From this screen the user can select the Document Type from a drop down box. The options are Invoice, Credit Note, Debit Note, Proforma Invoice and Prepayment Invoice. Note: Credit Notes are entered as positive figures but will show against the Work Order as a negative value.
5. A duplicate check will be performed. This will bring up a list of potential work orders that this invoice could apply to. Duplicate criteria is as follows:
Same site (Building), same attendance date and the same Resource.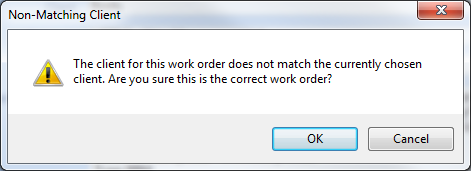

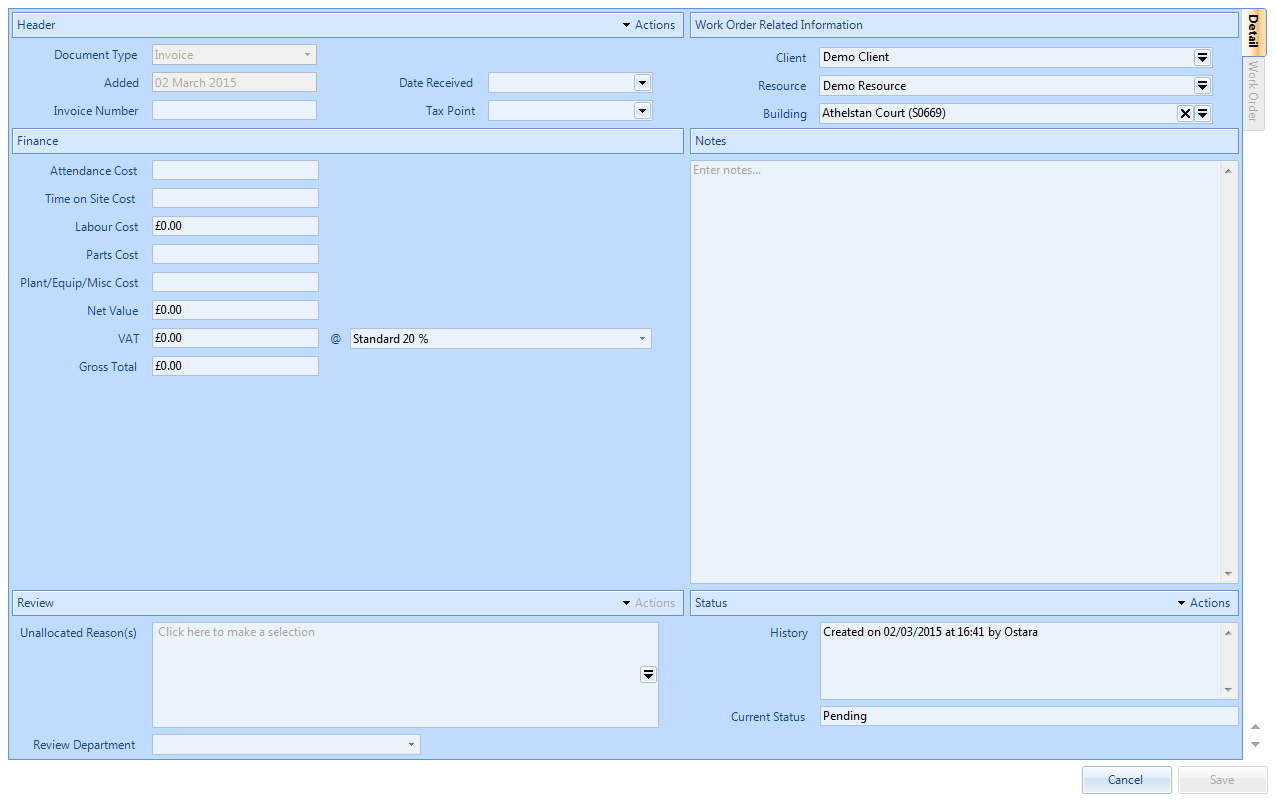
Document Type is a drop down box where the type of Invoice can be selected. The options are Invoice, Credit Note, Debit Note, Proforma Invoice and Prepayment Invoice. To change this or add a work order number click on the Actions button and Change Type.
Note: If Proforma Invoice is selected in the Document Type field, the "Replaced by Invoice" radio buttons appear. Select either "Yes" or "No" before proceeding.
Added is a non-editable field that contains the date the Invoice was added to the system.
Date Received is a calendar drop down where the date the Invoice was received is entered.
Invoice Number is a freeform field where the number of the Invoice is entered. Note: this field allows a maximum of 30 characters.
Tax Point is a calendar drop down where the tax point date for the Invoice is entered.
Client is a drop down field that will contain the Client chosen in the previous screen. This can be changed from this screen but will remove any resource or building selected previously.
Resource is a drop down field that will contain the Resource chosen in the previous screen. This can be changed from this screen.
Building is a tick selection of all of the Buildings for the Client that has been selected. Tick the Building relevant to the Invoice.
Attendance Cost is a numerical field in which the cost of the attendance for the work is entered.
Time on Site Cost is a numerical field in which the cost of the time spent on site for the work is entered.
Labour Cost is a non-editable field which calculates the Attendance Cost and Time on Site Cost.
Parts Cost is a numerical field in which the cost of any parts used to complete the work is entered
Plant/Equip/Misc Cost is a numerical field in which any other costs that relate to the work are entered.
Fixed Cost is a numerical field in which an all inclusive price for the work that was carried out is entered. If a Fixed Cost is entered it supersedes any other costs (e.g. Calculated costs, AOVs) as the Fixed Cost is the final amount that will be charged.
Net Value is the total value of all the costs. This calculates the value automatically.
VAT is a numerical field where the VAT cost is entered. The drop down field contains the VAT rates available to the Resource selected for this Invoice. The VAT Rate changes depending on the date in the Tax Point and will use the respective VAT Rates of that Tax year.
Gross Total is the total sum of the Net Value and the VAT costs.
Replacement is tick box that can be selected to say that a replacement Invoice is required. This becomes enabled once the Unallocated Reasons have been selected.
Unallocated Reasons is a pop up menu where any reasons as to why the Invoice is unallocated can be selected.
Review Department is a drop down menu where the department the Invoice is going to be reviewed by is chosen.
Invoice Notes is a freeform field where any notes that are relevant to the Invoice can be entered.
14. Once all the Invoice information has been entered, click "Save".
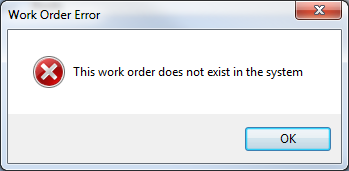
Note: These are the other types of messages you may receive and the reason for receiving them:
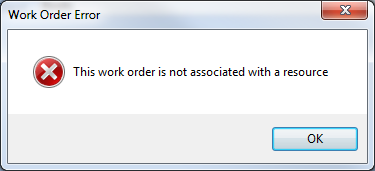
When trying to allocate a work order that hasn't yet been assigned to a resource (i.e. at Status 0.03 - Pending Resource Allocation)
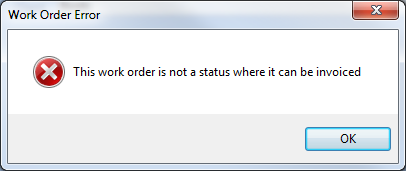
When trying to allocate a Work Order that is not at the correct status to be invoiced (i.e. 1.00 - Pending assign and 1.03 - Pending Acceptance)