Viewing/Editing an Invoice Intoduction
In order to view/edit an existing Invoice, the User must first locate the Invoice they wish to edit by performing an Invoice Search.
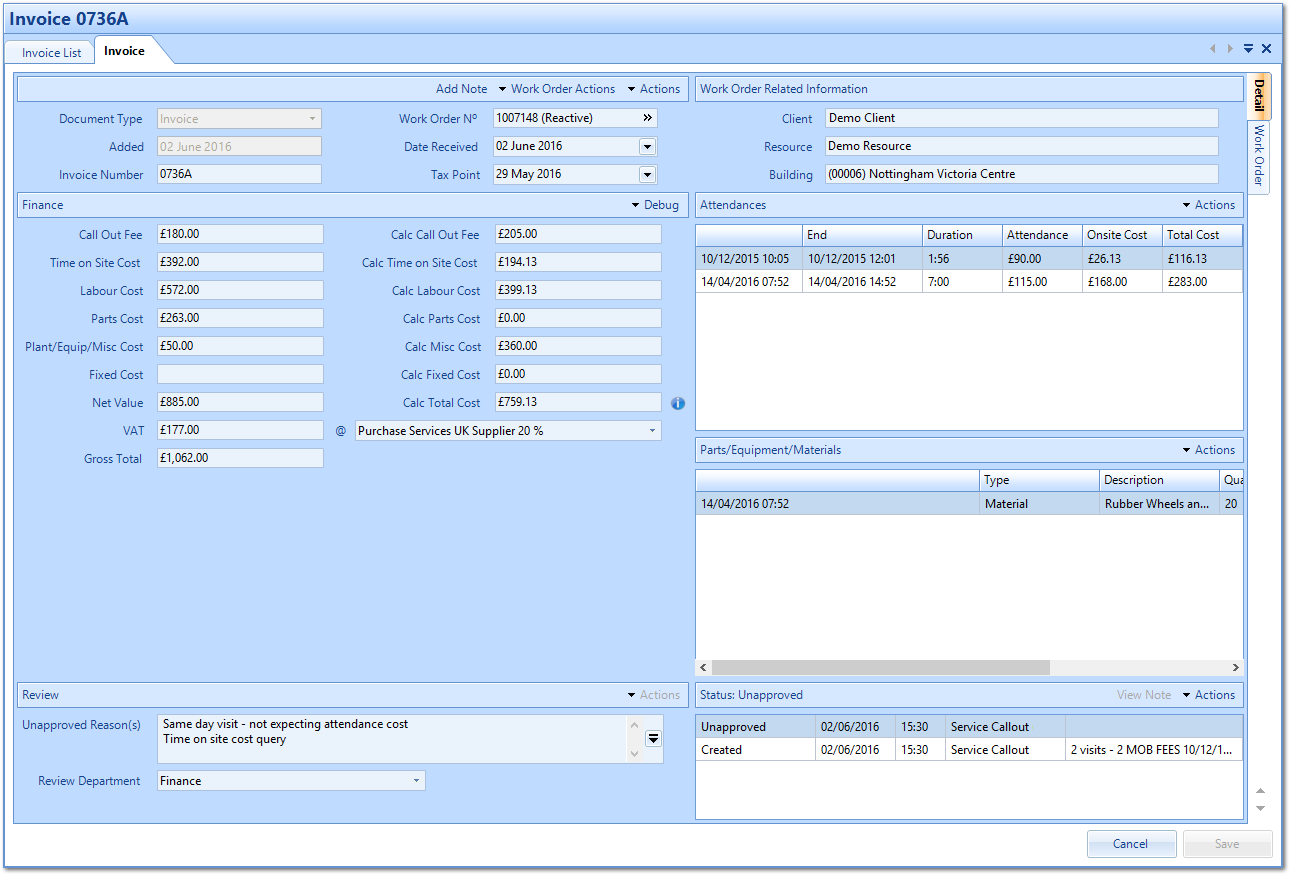
Once the user has located the Invoice they would like to edit they can open the Invoice by either double-clicking on the Invoice in question or by highlighting and clicking on the "Next" button. The Invoice will open and can now be amended:
Once the user has located the Invoice they would like to edit they can open the Invoice by either double-clicking on the Invoice in question or by highlighting and clicking on the "Next" button. The Invoice will open and can now be amended:
Each Invoice has a typical life cycle. This life cycle is as follows:
Invoice Added → Approved → Validated → Payment Submission
Where the Invoice is in this life cycle will determine which actions you are able to perform. The "Actions" available are as follows:
Header
Change Type
Once an Invoice has been entered the User is able to change the document type (e.g change to credit note, pro-forma etc). This can be done up until it has been approved. See the following steps on how this can be done:
1. Click the Actions menu option on the Header section of the invoice.
2. Click on Change Type. This screen will open:
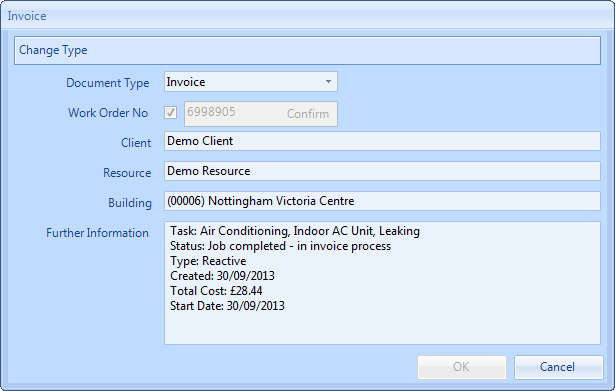
3. Click on the Document Type drop down arrow and make a selection and click on OK.
4. Click on the Save button to save the new document type. Note: When changing an Invoice to a Credit note (or vice versa) the values remain the same on the invoice but will change from positive to negative on the Work Order.
Assign Work Order
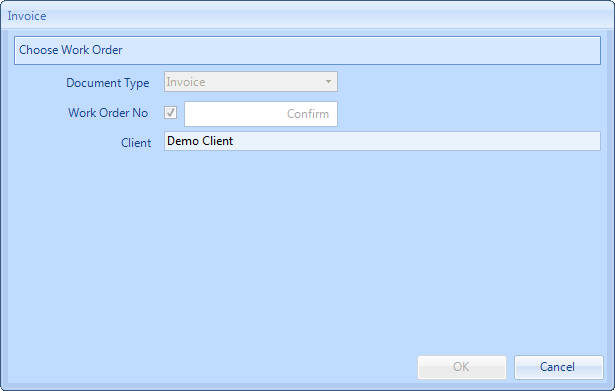
Once a Work Order number is known it can be assigned to an Invoice. This can be done by following these steps:
Once a Work Order number is known it can be assigned to an Invoice. This can be done by following these steps:
1. Click the actions menu option on the Header section of the Invoice.
2. Click on Assign Work Order. This screen will open:
4. A duplicate check will be performed. This will bring up a list of potential Work Orders that this Invoice could apply to. Duplicate criteria is as follows:
Same site (Building), same attendance date and the same Resource.
Same site (Building), same attendance date and the same Resource.
5. If the Work Order does not relate to the Client selected then the following message will be displayed:
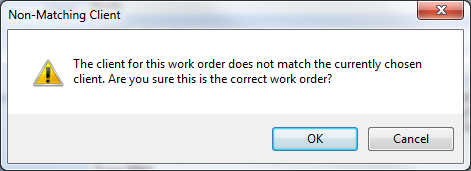
6. Clicking OK will select the Work Order regardless and clicking Cancel will return the User to the Finance module.
7. If the Work Order number entered has a zero accrual the following message will be displayed:
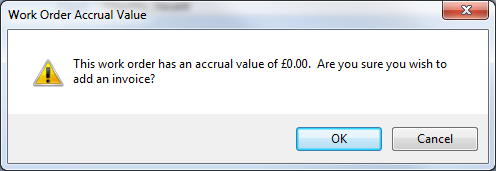
8. Clicking OK will select the Work Order regardless and clicking Cancel will return the User to the previous screen.
9. Once a Work Order number has been entered it will populate the Invoice pop up with the Work Order details. Click OK to assign the Invoice to the Work Order number selected.
Attendances
Amend Start/Stop Times
Start/Stop times can also be amended from the Invoice. This can be done by following these steps:
Start/Stop times can also be amended from the Invoice. This can be done by following these steps:
1. Click the Actions menu option on the Attendances section of the invoice.
2. Click Amend Start/Stop Times. This window will open:
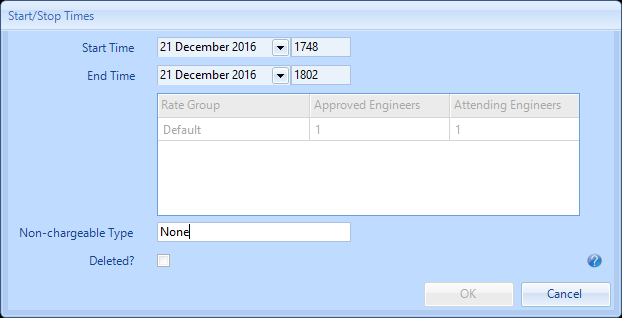
3. The Start and End Dates and Times can now be amended by either clicking on the drop down arrow to show a calendar, or by simply over typing in the relevant fields.
4. Clicking "OK" will apply these new dates/times to the Work Order and recalculate the costs where applicable.
Add Visit
Should an extra visit have been carried out on a Work Order, but not recorded prior to Work Order completion. Extra visits can be added by following these steps:
Should an extra visit have been carried out on a Work Order, but not recorded prior to Work Order completion. Extra visits can be added by following these steps:
1. Click the Actions menu option on the Attendances section of the invoice.
2. Click Add Visit. This window will open:
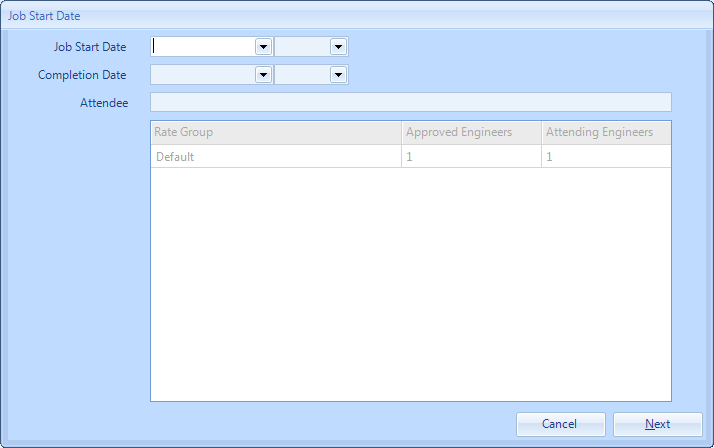
3. The additional visit can now be added by following Stop Job > Admin through completing the fields as specified.
4. At the end of the wizard, clicking "Save" will apply this new visit to the Work Order and recalculate the costs where applicable.
Review
View Unallocated
This will toggle between the View Unallocated and Unapproved reasons. This can be done by clicking on the actions menu option on the Review section of the Invoice and clicking View Unallocated.
This will toggle between the View Unallocated and Unapproved reasons. This can be done by clicking on the actions menu option on the Review section of the Invoice and clicking View Unallocated.
View Unapproved
This will toggle between the View Unapproved and Unallocated reasons. This can be done by clicking on the actions menu option on the Review section of the invoice and clicking View Unapproved.
This will toggle between the View Unapproved and Unallocated reasons. This can be done by clicking on the actions menu option on the Review section of the invoice and clicking View Unapproved.
Status
Replacement Requested
A replacement can be requested by clicking on the actions menu option on the Status section of the invoice. Clicking replacement requested option will change the current status to Replacement Requested.
A replacement can be requested by clicking on the actions menu option on the Status section of the invoice. Clicking replacement requested option will change the current status to Replacement Requested.
Replacement Received
Once a replacement has been received the User can update the Invoice by clicking on the actions menu option on the Status section of the invoice. Clicking the Replacement Received option will change the current status to back to what it was prior to replacement requested.
Delete
Delete
On occasions, there may be a need to be able to delete an Invoice. This can be done by clicking on the actions menu option on the Status section of the Invoice. Clicking on Delete will pop up a message stating "Are you sure you wish to delete this invoice? This action cannot be undone." Clicking Yes will delete this Invoice permanently and clicking No will return the User to the Invoice screen.
Reject Portal Submission
Upon submitting an Invoice via the Portal it will be submitted as unapproved with an unapproved reason of Portal Submission - awaiting review. This Invoice can then be rejected by clicking on the action menu option on the Status section of the Invoice. Upon clicking on Reject Portal Submission a notes screen will appear. Any notes entered will be able to be viewed on the portal. The Current Status field will update to Rejected.
Upon submitting an Invoice via the Portal it will be submitted as unapproved with an unapproved reason of Portal Submission - awaiting review. This Invoice can then be rejected by clicking on the action menu option on the Status section of the Invoice. Upon clicking on Reject Portal Submission a notes screen will appear. Any notes entered will be able to be viewed on the portal. The Current Status field will update to Rejected.
Approve
Once an Invoice has been input onto the system it will need to go through two steps before it can be submitted for payment. These stages are Approval and Validation. Invoices can be approved if they are at an Unapproved status. To approve an Invoice, follow the below steps:
Once an Invoice has been input onto the system it will need to go through two steps before it can be submitted for payment. These stages are Approval and Validation. Invoices can be approved if they are at an Unapproved status. To approve an Invoice, follow the below steps:
1. Once the Invoice has been opened, double check all the details and confirm that everything is as it should be.
2. If the Invoice is at Unapproved: the User must first resolve the Unapproved Reasons by remove them from the Unapproved Reasons field.
3. Click the actions menu option on the Status section of the invoice.
4. Click approved. The "No further Invoice Expected" box will be ticked automatically. If you are expecting another invoice against this Work Order, untick this box.
5. Click "Save" to apply the changes. Note: If no further invoice expected is not unticked the invoice will be saved automatically.
Cancel Approved
On occasions there may be a requirement to unapprove an Invoice. To unapprove an Invoice, follow the below steps:
1. Click the actions menu option on the Status section of the invoice.
2. Click cancel approved. The Select Reasons dialog will appear:
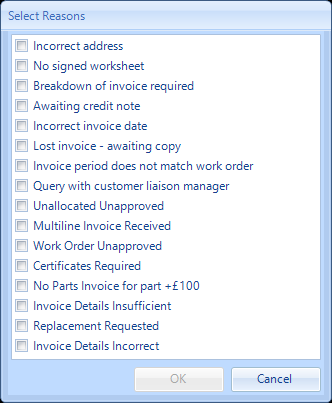
3. Select one or more Reasons, and Click OK. The Undo Approved dialog will be visible for you to enter a Review Department and Notes to justify the Unapproved action:
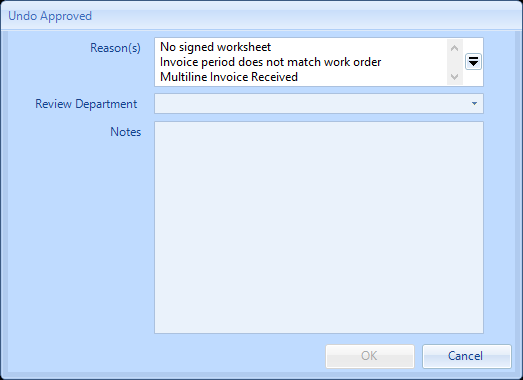
4. Once the fields have been completed, click on OK to save the changes.
Validate
Once an Invoice has been input onto the system it will need to go through two steps before it can be submitted for payment. These stages are Approval and Validation. Invoices can be validated once they have been approved. To validate an Invoice, perform the following:
Once an Invoice has been input onto the system it will need to go through two steps before it can be submitted for payment. These stages are Approval and Validation. Invoices can be validated once they have been approved. To validate an Invoice, perform the following:
1. Click the actions menu option on the Status section of the Invoice.
2. Click "Validate". The Current Status field will be updated to "Validated".
Invalidate
On occasions there may be a requirement to invalidate an Invoice. To do this, follow the below steps:
On occasions there may be a requirement to invalidate an Invoice. To do this, follow the below steps:
1. Click the actions menu option on the Status section of the invoice.
2. Click "Invalidate". The Current Status field will be updated to "Approved".
Submit for Payment
Once Invoices have been both approved and validated, they can finally be submitted for payment. To set an Invoice to Payment Submission, follow the steps below:
Once Invoices have been both approved and validated, they can finally be submitted for payment. To set an Invoice to Payment Submission, follow the steps below:
1. Click the actions menu option on the Status section of the Invoice.
2. Click "Submit for Payment". The Current Status field will be updated to "Payment Submission".
Set As Unpaid
On occasions, there may be a requirement to revoke the payment submission of a Payment Submission Invoice. To do this, follow the below steps:
1. Click the actions menu option on the Status section of the Invoice.
2. Click "Set As Unpaid". The Current Status field will be updated to "Validated".