Creating an Asset Introduction
Assets can be used in Reactive, Quoted and PPM Work Orders and are easily created. Click the "Create Asset" button to create a new Asset.
1. The first step is to select the Client that will be used. For information on how to do this, see the Client Selection page
2. The Asset detail screen appears after selecting a Client. This is where all the information required for the Asset is entered. Each field is explained below:
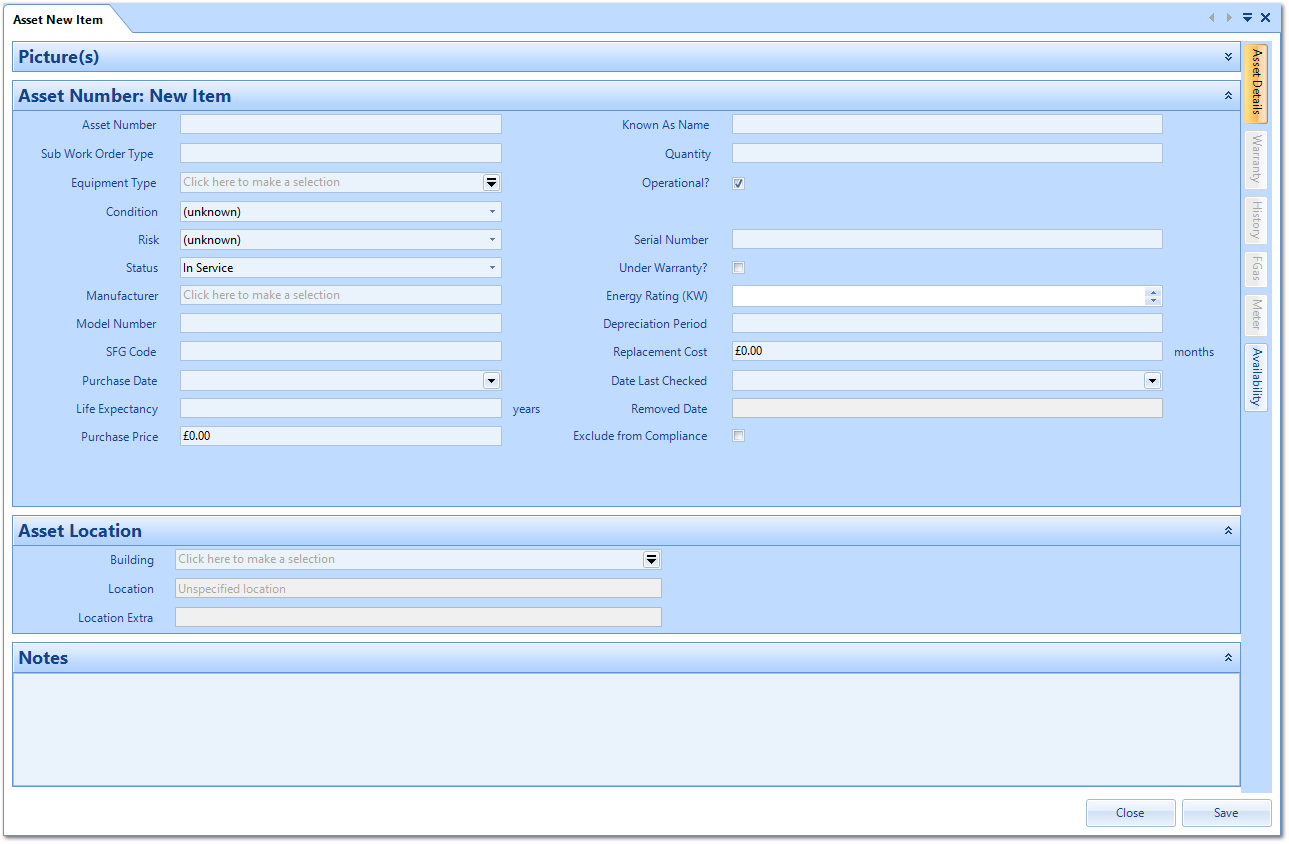
Picture(s) is a expandable/collapsible menu where pictures relating to the Asset are shown. These appear once they have been added through the Add/Edit/View Documents button.
Asset Number is a freeform field to input the number that will be assigned to the new Asset. This can be numbers and letters.
Known as Name is a freeform field to enter the name that this Asset is commonly referred to.
Sub Work Order Type is a read only field that displays the Sub Work Order type of the selected Equipment Type.
Quantity is a freeform number field to enter the quantity of the Asset.
Equipment Type is a pop up selection screen to choose the Equipment Type of the Asset that is being created.
Operational? Tick this field if this Asset is currently operational. This can also be toggled when the Asset is added the Work Order.
Condition is a drop down menu to choose the current Condition of this Asset. Conditions are setup in Asset Conditions section of Core Data.
Risk is a drop down menu to choose the current Risk of this Asset. Risks are setup in Asset Risks section of Core Data.
Status is a drop down menu to choose the current status of this Asset. (A specific Permission exists to restrict a User's ability to change this field). It should also be noted that should an asset be marked as Scrapped, the system will automatically check all Contracts where this Asset is either specified and derived, and if it is the last Asset for that Building on a PPM Task, then the system will automatically remove that Building from the PPM Task (as the PPM visit will no longer be required)
Manufacturer is a pop up selection screen to choose the manufacturer of the Asset.
Under Warranty? Tick this field if this Asset is under warranty and the warranty details can be entered. The Warranty tab of the Asset will then become enabled.
Model Number is a freeform field. This can be numbers and letters.
Serial Number is a freeform field. This can be numbers and letters.
SFG Code is a freeform field. This can be numbers and letters.
Energy Rating (KW) is a number field that allows the User to enter the number in manually or by clicking the up and down arrows to increase or decrease the number. Allows up to two decimal places.
Purchase Date is a date field to enter the date this Asset was bought.
Life Expectancy is a freeform number field to enter how long the Asset is expected to last for.
Depreciation Period is a freeform number field to enter how long the depreciation period for the Asset will be.
Purchase Price is a currency field to enter the amount the Asset was purchased for.
Replacement Cost is a currency field to enter the amount it costs to replace the Asset.
Removed Date allows the User to enter the date that this Asset was scrapped. This field becomes active if the Asset is marked as "Scrapped".
Date Last Checked is a date field which provides the ability to enter the last date this Asset was checked.
Exclude from Compliance Tick this field if this Asset is to be excluded from the compliance reports.
Building is a pop up screen which displays all Buildings for the selected Client. This enables Users to search for the required Building for this Asset.
Location is a pop up screen which shows all locations stored against the chosen Building.
Location Extra is a freeform field that provides the ability to enter a more detailed location if known.
Notes is a freeform field that provides the ability to enter additional information as required.
When creating a Component Asset (by clicking the "Create Component Asset" button), the only difference in the Asset Detail screen is that a Parent Asset Number is required. When selecting a Parent Asset, a separate menu will appear in which the Parent can be selected. The rest of the details are entered in the same way as an Asset.
3. If the "Under Warranty?" field was ticked previously, then the Warranty tab will be available. This tab is where the details of the Asset Warranty are entered. Warranty details, including type of warranty, length of warranty and who the warranty is held with, are logged in this screen. Each field is explained below:
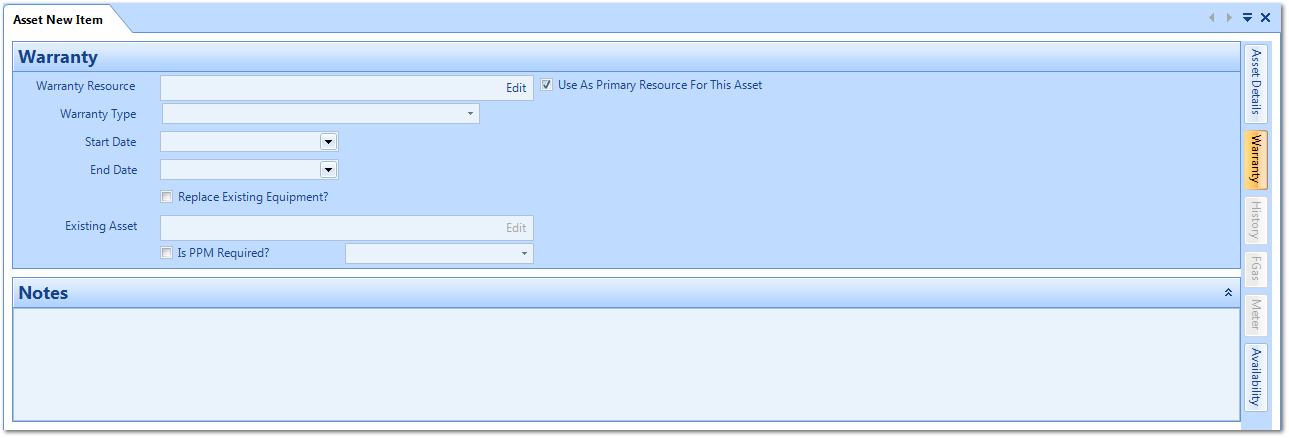
Warranty Resource is a pop up list of Manufacturers that can be selected to act as the Warranty Resource for the Asset.
Use As Primary Resource For This Asset is a tick box that declares that the Warranty Resource selected is the Primary Resource to contact concerning this Asset.
Warranty Type is a tick selection to choose what type of warranty this Asset has.
Start Date is a date field which provides the ability to enter the start date of the warranty.
End Date is a date field which provides the ability to enter the end date of the warranty
Replace Existing Equipment? is a tick selection. If this is ticked, the "Existing Asset" field is enabled.
Existing Asset is a pop up search screen to choose the Asset which is being replaced. This is only active if the above has been ticked.
Is PPM Required? is a tick selection. If this is ticked you can then choose the frequency of the required PPM. Here, it is possible to set how often the PPM is to occur. It can be set Monthly, Quarterly or Yearly.
It's also possible to provide any notes concerning the Asset. These can be entered in the "Notes" field.
4. Once the Asset details have been completed, the availability of the Asset can also be added. This is done by clicking the "Availability" tab.
On the Asset Availability screen, it's possible to provide the times the Asset is in hours and the times the Asset is out of hours. Set the In-hours times by clicking the green "In-hours" button and selecting the appropriate times and set the Out of hours times by clicking the red "Out of hours" button and selecting the appropriate times.
On the Asset Availability screen, it's possible to provide the times the Asset is in hours and the times the Asset is out of hours. Set the In-hours times by clicking the green "In-hours" button and selecting the appropriate times and set the Out of hours times by clicking the red "Out of hours" button and selecting the appropriate times.

5. Once all the information has been entered, click "Save" to create the Asset.